Michael Russell UX Design Case Study
Fluidity Solutions September-December 2024

Designing an education platform for members of the Digital City (Southern African Setswana diaspora). The initiative with the Digital School is to bring expert technological education to the people and lift up the community with strong skills for the 21st century. Many of the classes and programmes focus on harnessing technological skills such as robotics, coding, AI and other computing projects, aimed at high school and above. The design for this involves two core users, the instructors and the students themselves. Instructors and Teachers are usually desktop first, while students (depending on the course) are mobile first.
Instructor Flows
Dashboard
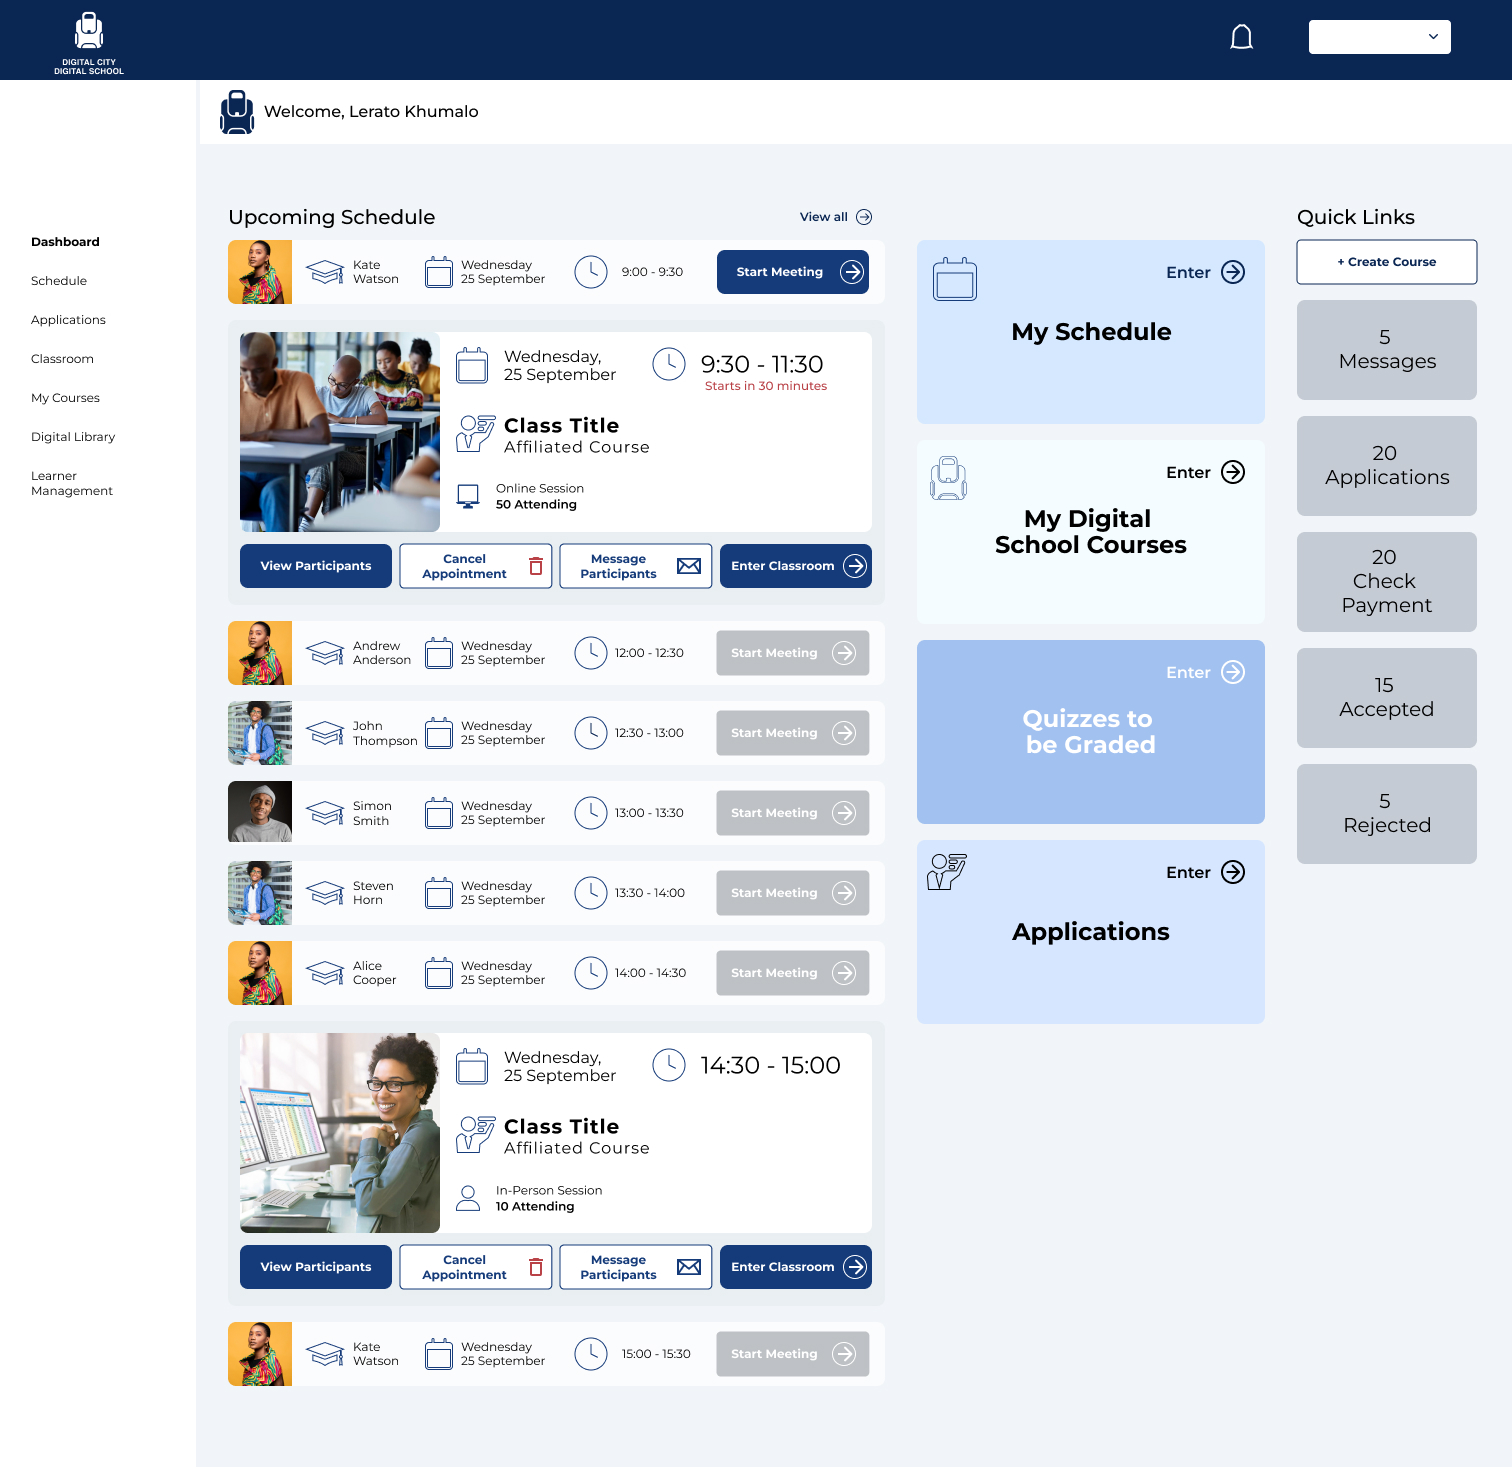
The Dashboard comprises of the daily schedule and all upcoming class sessions and one to one’s with students. The Side navigation can hop between the Digital Library and Learner Management system (which is an admin tool). The rest of the boxes navigate to:
- My Schedule
- Which is able to be adapted and changed by the instructor.
- My Digital School Courses
- Courses created and taught by the instructor.
- A list of who is taking the course, quizzes, and past participants of each course.
- Quizzes that require grading.
- Applications from students in upcoming classes.
- Create a Course.
- Allows instructors to create courses.
- Messages from students
- Check Payment (see if applicant payments have come through.
- Lists of accepted and rejected applicants.
Course Creation
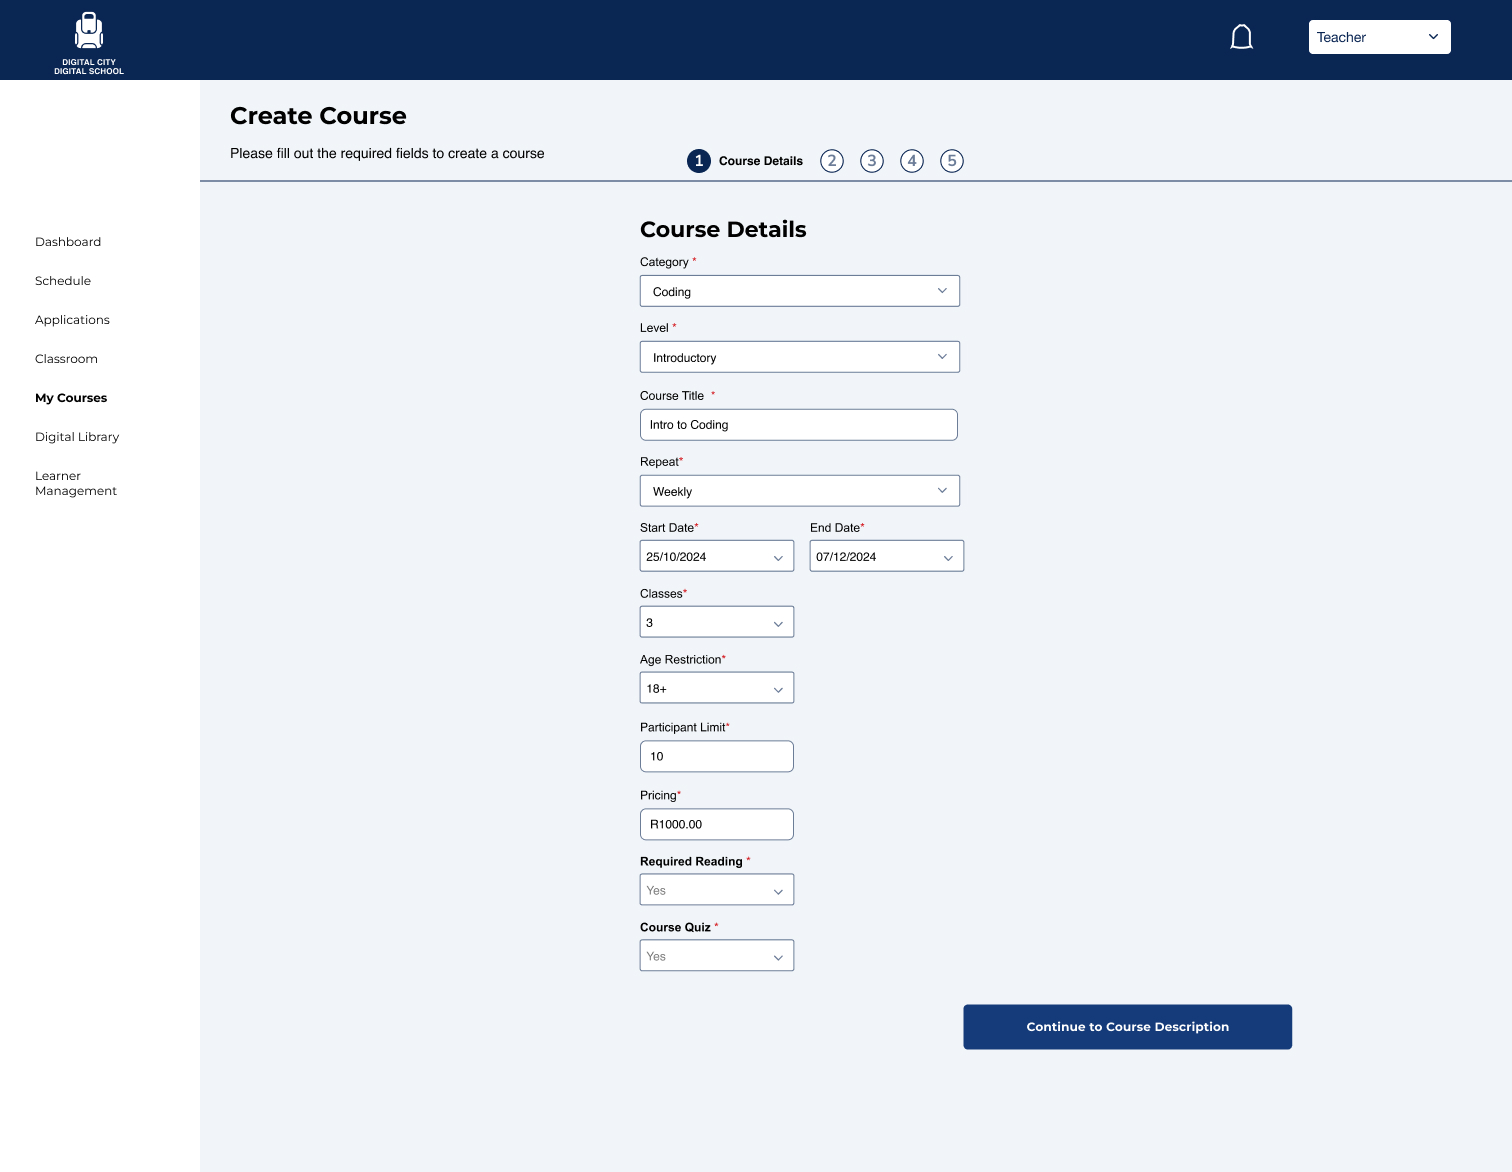
Once the Instructor selects ‘Create Course’ they enter the course details in a form fill. Each Course contains a certain amount of classes or modules (for programmes) and they must set levels, times, participant limits, age requirements, whether there is required reading, etc.

For Programmes it is essentially the same except that sometimes students are offered assets that they rent out from the Tribal Headquarters. This may be books, tools or a laptop to ensure that they have all the necessary accommodations to complete the courses. After completing this step they enter the Course Description and add any media that is necessary.
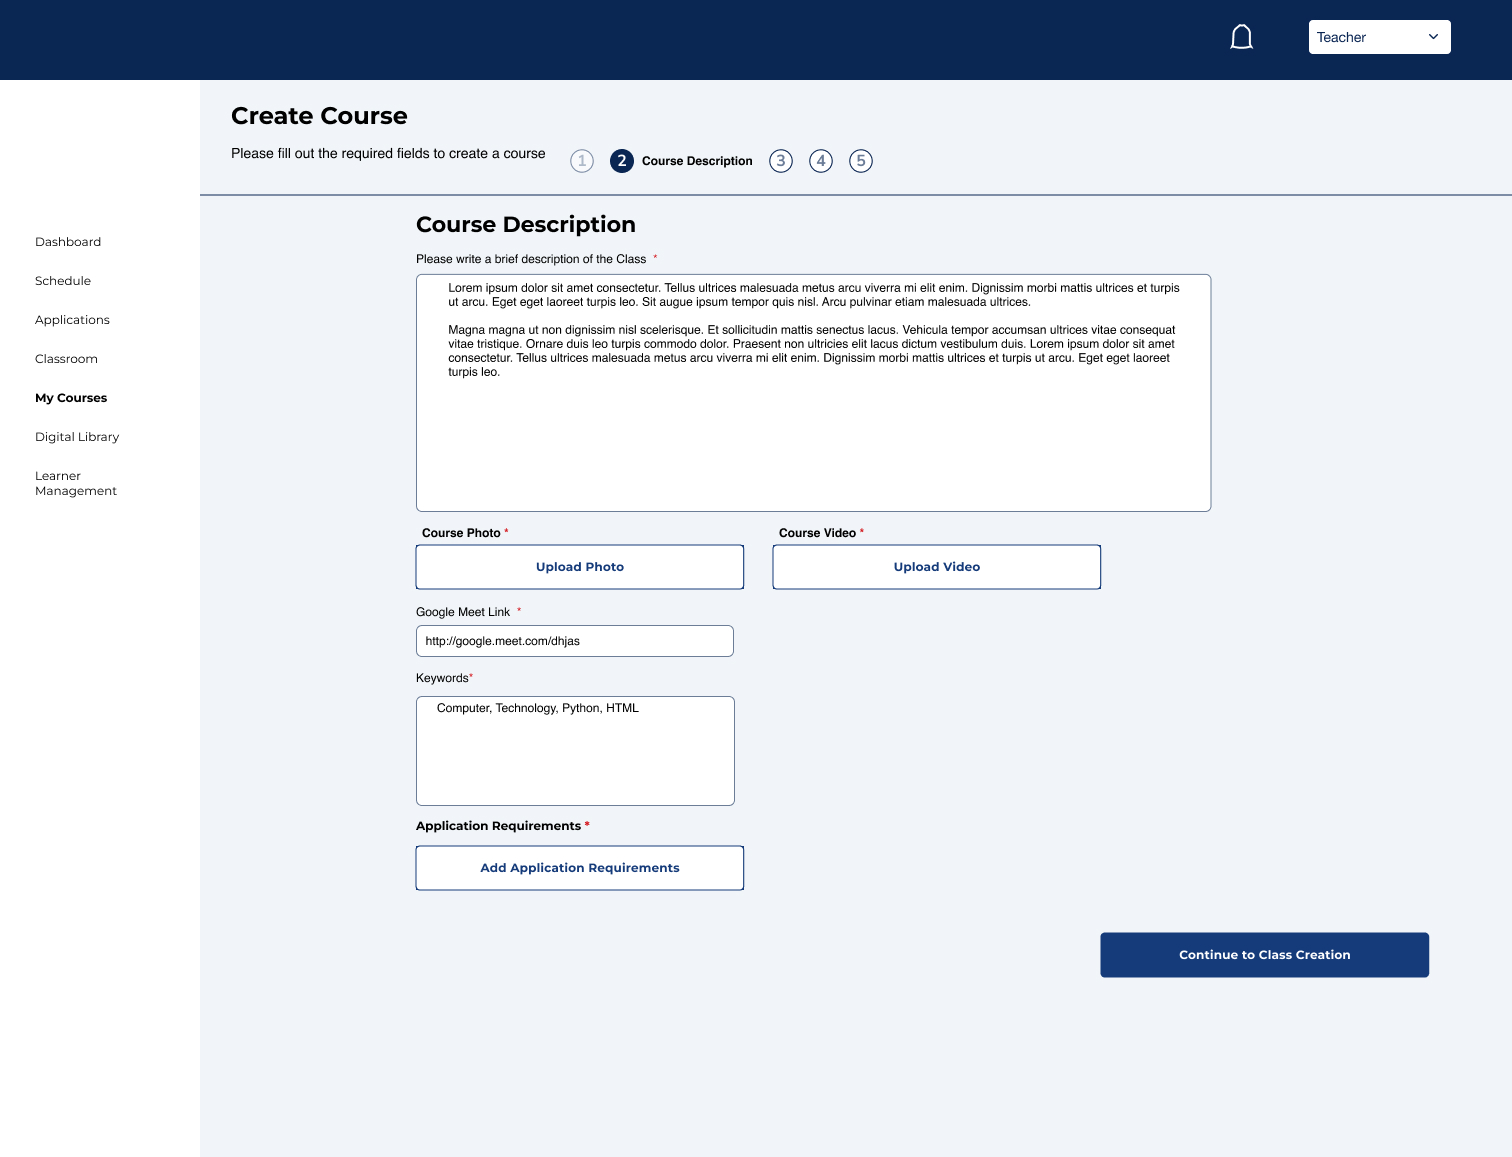
The Course Description is where the instructor inputs data such as meeting links for online classes (some are in person classes if its an on-site programme). Keywords so community members can easily find it in search as well as media such as videos and photos as well as adding application requirements such as qualifications.
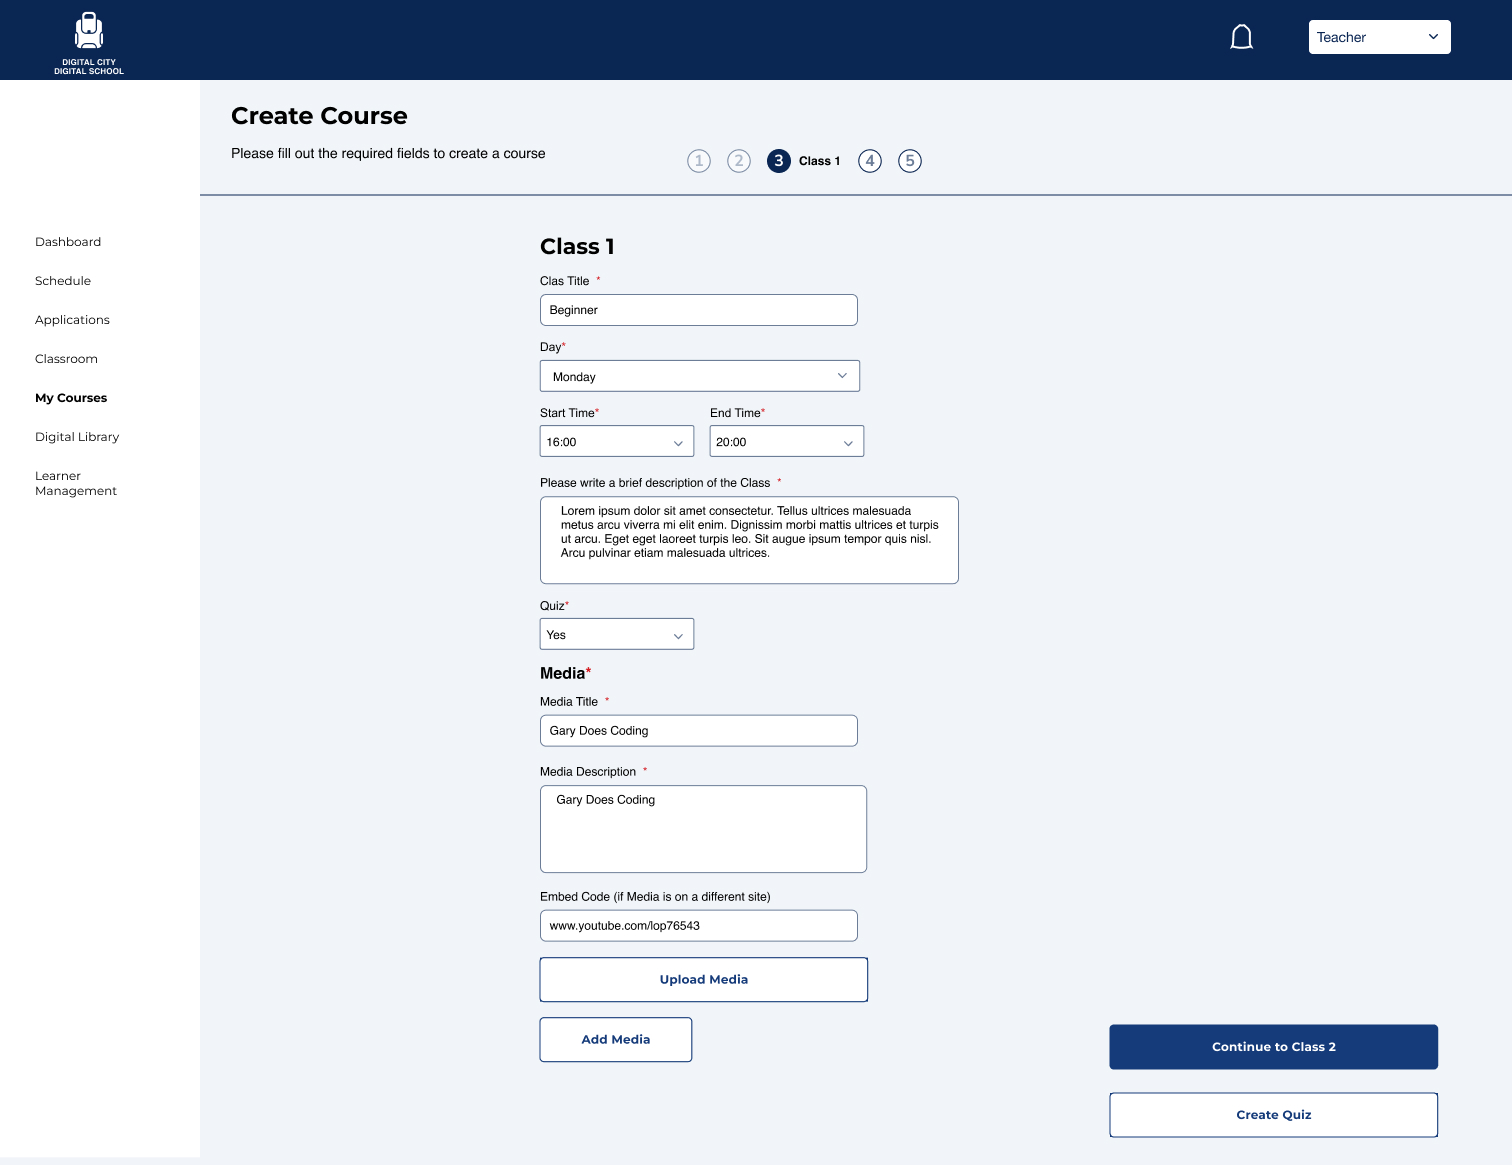
Courses are divided into ‘classes’ so the instructor must add each individual class or module to the course with any necessary media such as videos and articles. They can also create a quiz or exam with each module but this is also an option once the class has been created. The Instructor can add as much media as the please by clicking the add media button.
Once the course is created the look and feel for student and instructors is very similar except that the instructor can add media and quizzes to the classes and the course.
Programme View
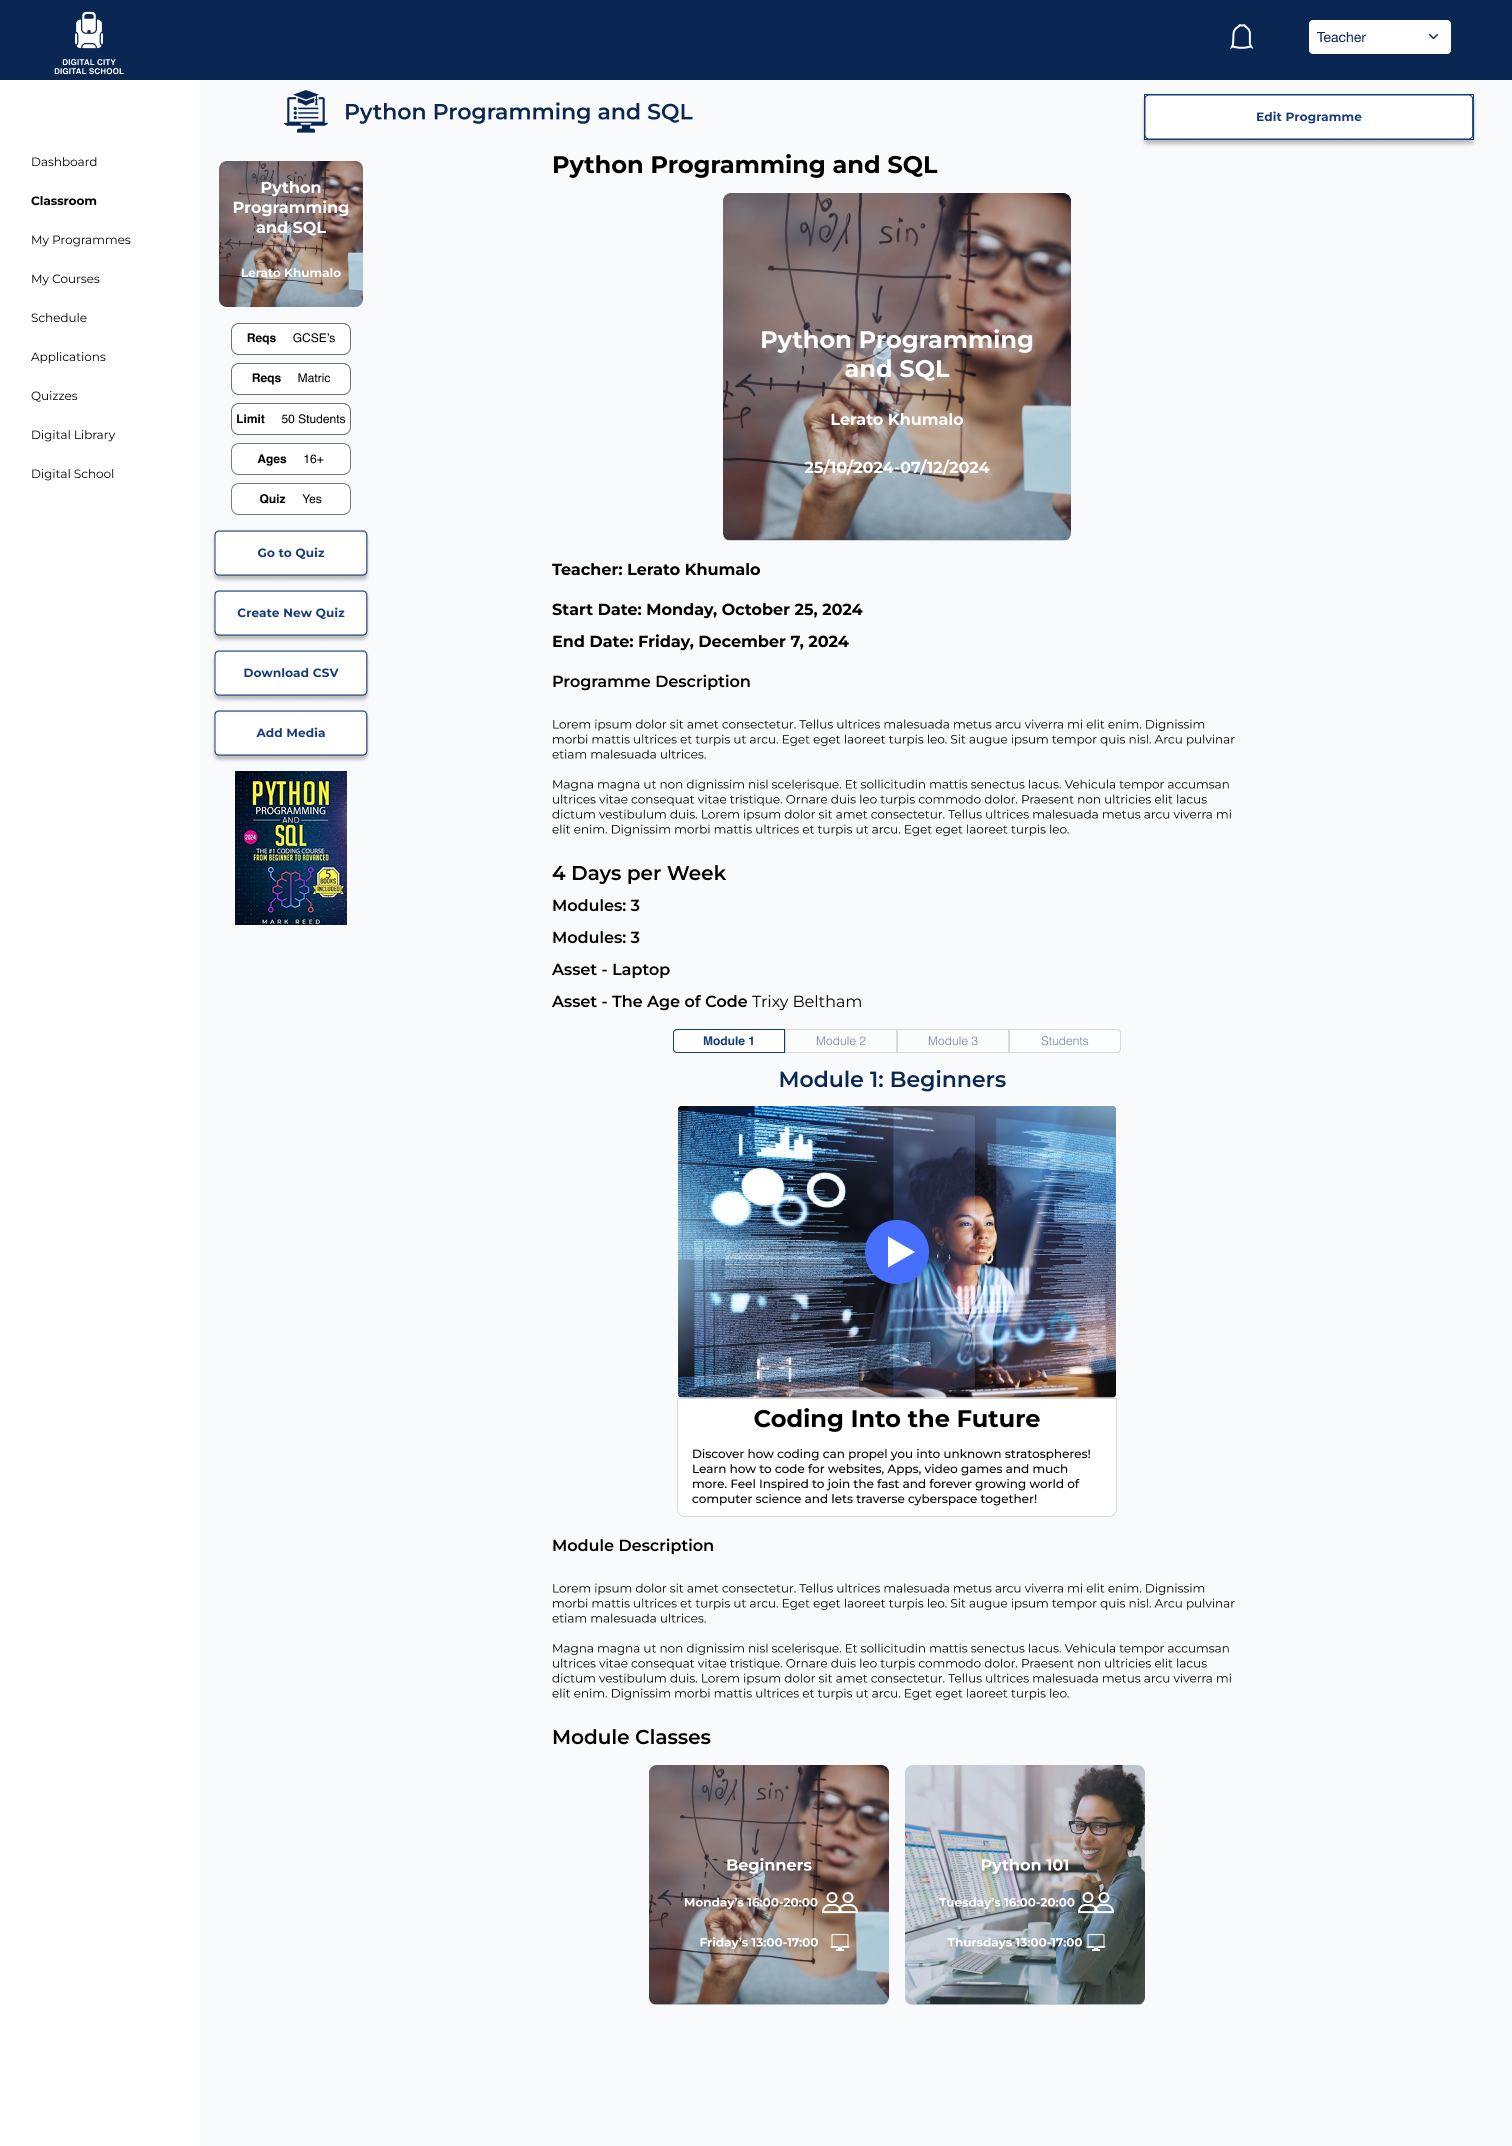
The Instructor can go through and edit the programme where need be. They can also
- download CSV
- Create Quizzes
- Edit Quizzes
- Add more media files
- Toggle between modules
- See the students involved in the course
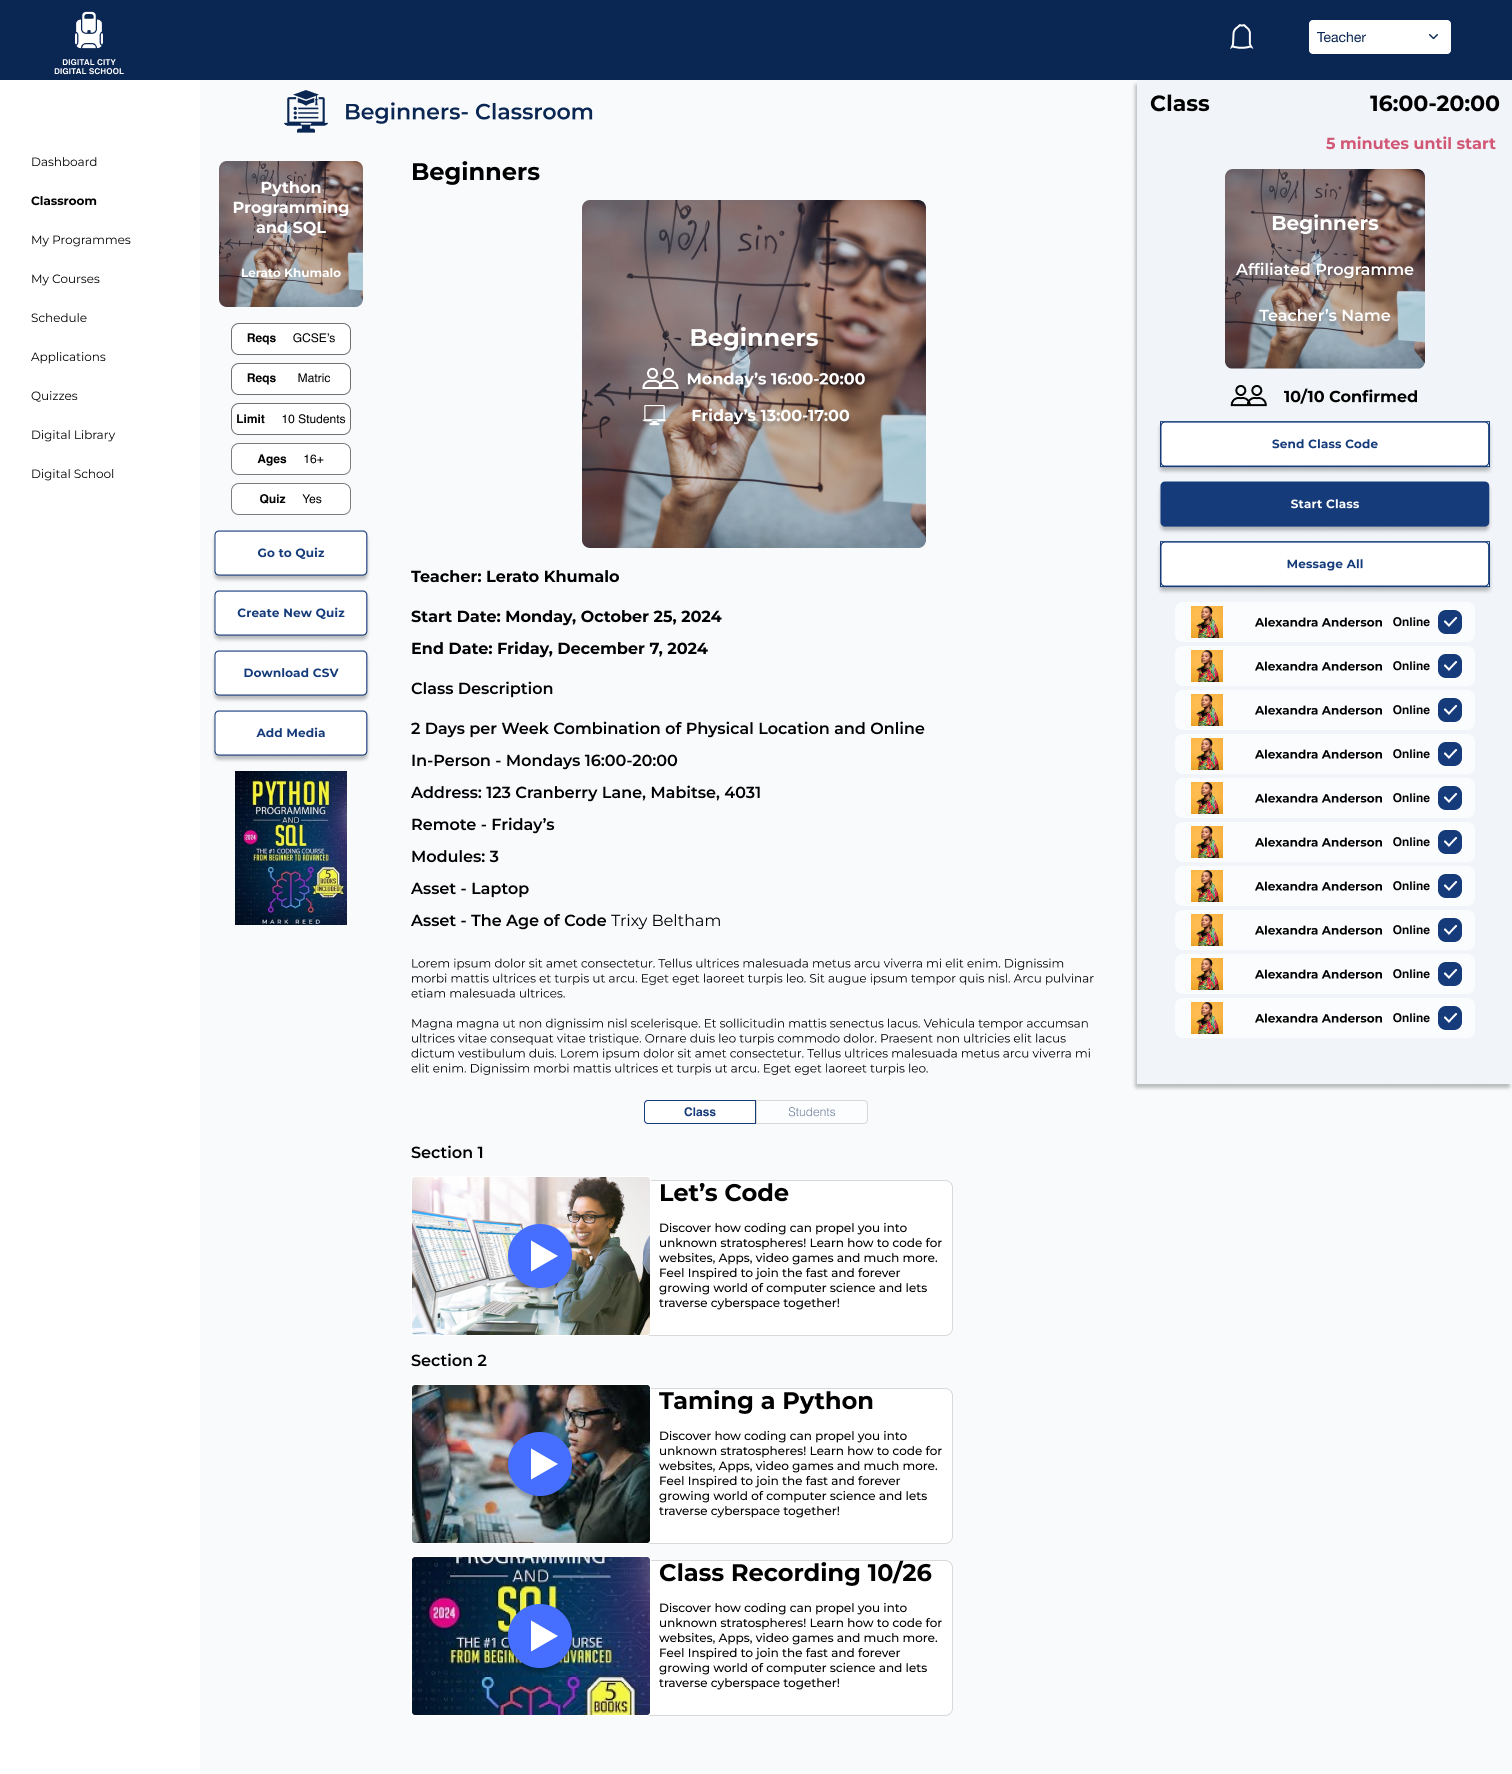
Class/Module view
The Instructor ‘Enters Classroom’ through the dashboard here.
The Classroom is for that particular class section of the course. The instructor must send a class code to log attendance in the system (even if the class is on-site) and once that is sent they can start the class.
Sorting through Applications
Since many of the courses/programmes require prerequisites, assets such as laptops and age limits all applicants must be vetted and approved by the instructors and then admins of the Digital City (if they are provided an asset such as a computer).

The Instructor can sort by:
- Date.
- Search for particular students.
- Organize between those who have already paid for the course.
- View Accepted and Rejected Applicants.
The Student profile pops up at the side when an applicant is selected and it shows their qualifications and whether they have the prerequisites or if their application is missing information. If the instructor clicks reject applicant they must message as to why the student has been rejected.
If everything is up to par with the applicant they merely click the ‘has the student paid tick
If the course requires an asset than the admin (instructors often have system administrator privileges) must vet them through the admin portal.
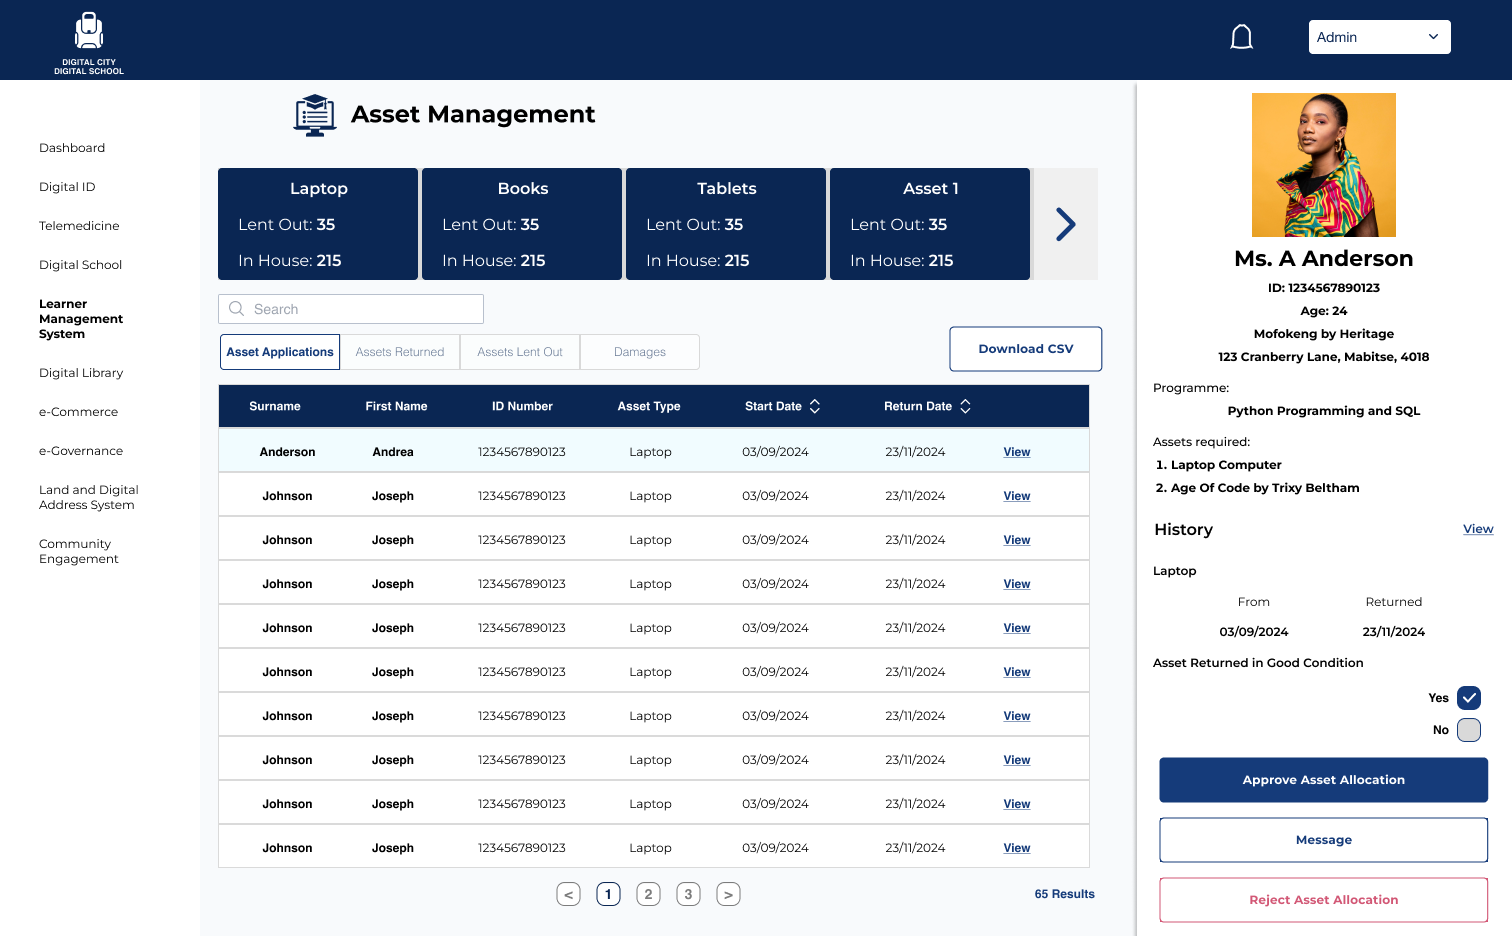
The asset management shows all of the available assets at the top and it contains all the information needed to see whether they are eligible to receive an asset.
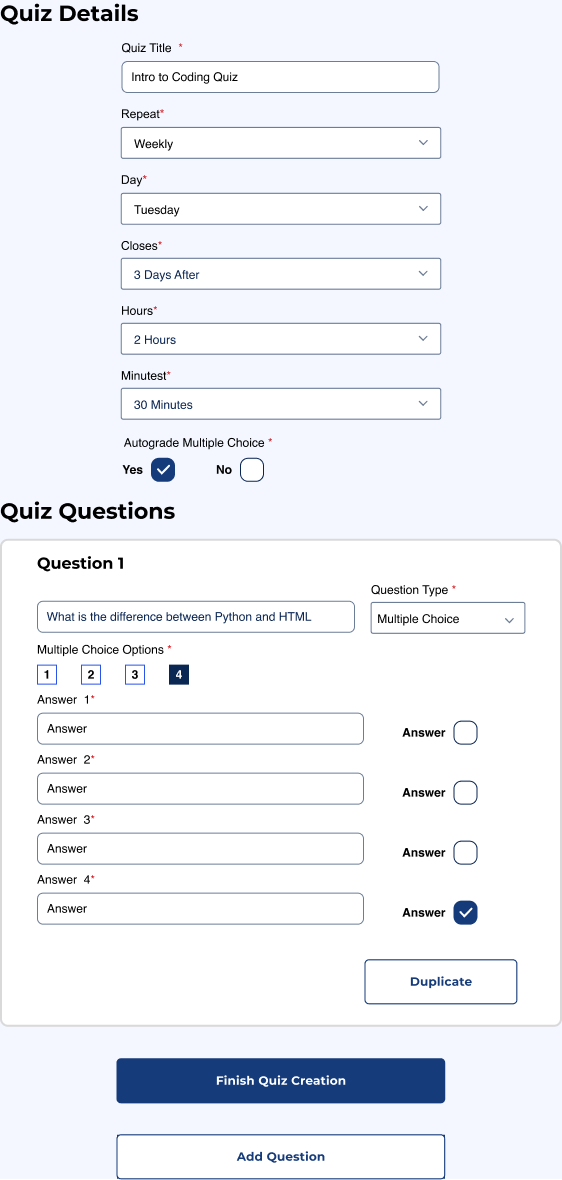
Creating quizzes and class organization
Creating quizzes is very similar to creating surveys with google. Multiple Choice, Short Answer and Polls. The quizzes are autograded except if there are short answer questions which the instructor must judge themselves.
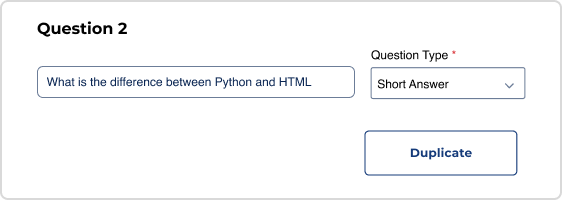
Short answer
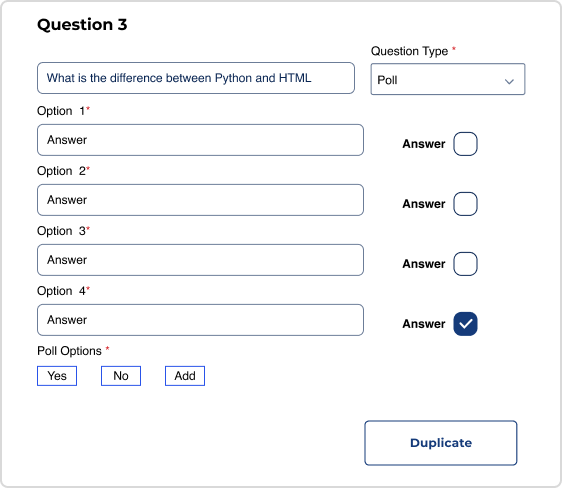
Poll
When the Instructor wishes to see student progress on particular courses they enter the “my courses tab through the dashboard.
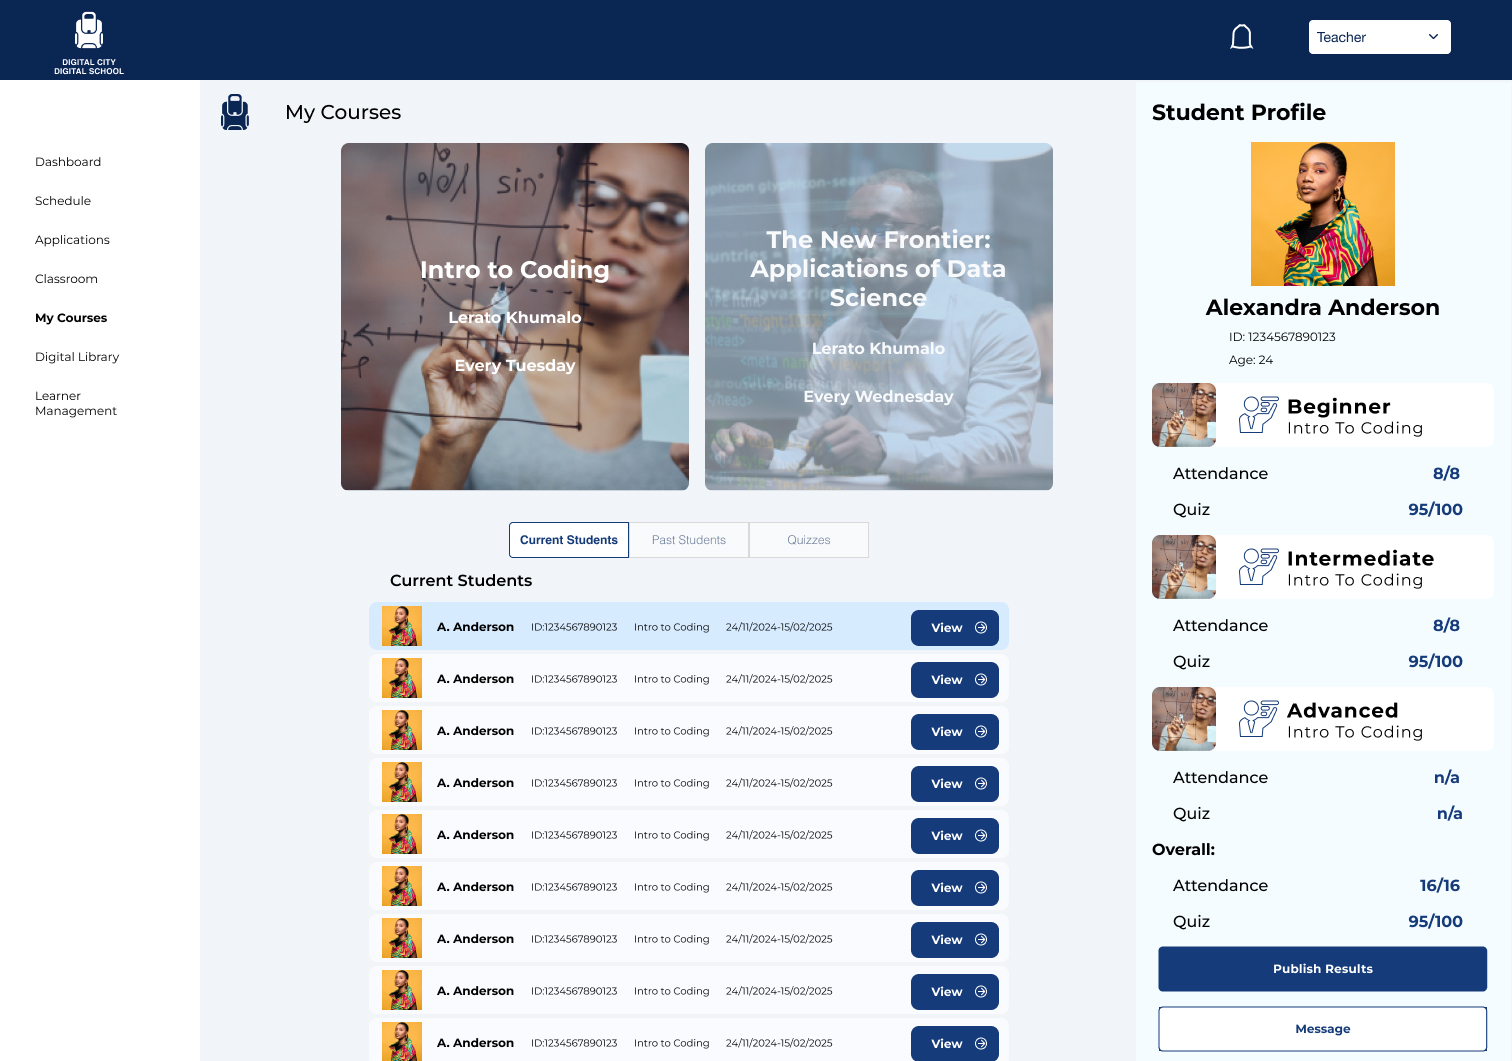
The instructor here is able to toggle between both of the courses they teach and see their current students. When they select a student the students profile appears on the right hand side with their progress. Once a course or programme is complete they publish the results. They also have access to all the quizzes and past students if there is anything that arises from past students.
Student Flows
Signing up for a course
- Dashboard

- Quick welcome blurb and top area navigation to toggle between different digital city platforms.
- Search bar to find specific classes or instructors.
- Programmes and courses sorted by popularity first followed by the type of niche skills (eg Technology and Trades)
- Users can search through the categories to find the course or programme that suits them or use the search bar. It is all about giving the users several avenues to find what they need.
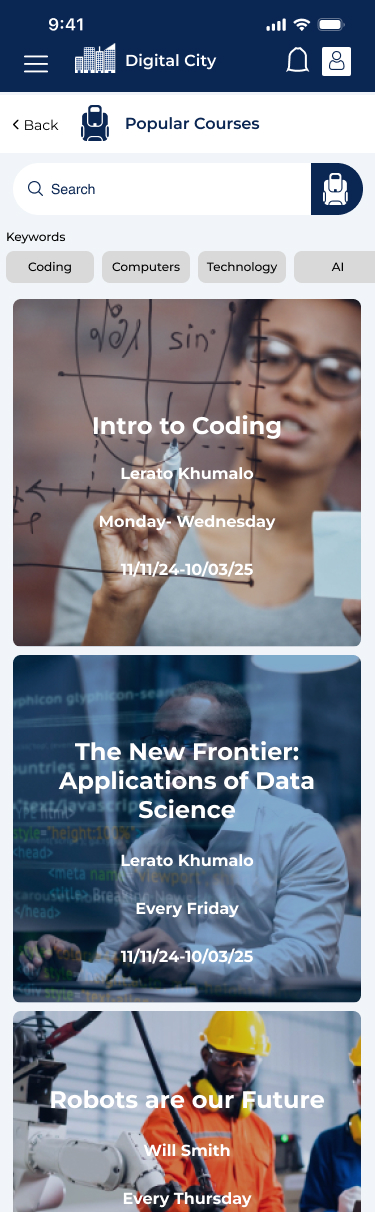
- User Selects Popular Courses from the dashboard.
- User still has ability to search in the search bar.
- User can tap on keywords to refine the search too.
- All the user has to do at this point is scroll through the courses to find one that works for them.
- Each Course thumbnail contains:
- The course title.
- Course Instructor
- Days of the Week the Course takes place.
- The Dates of the course.
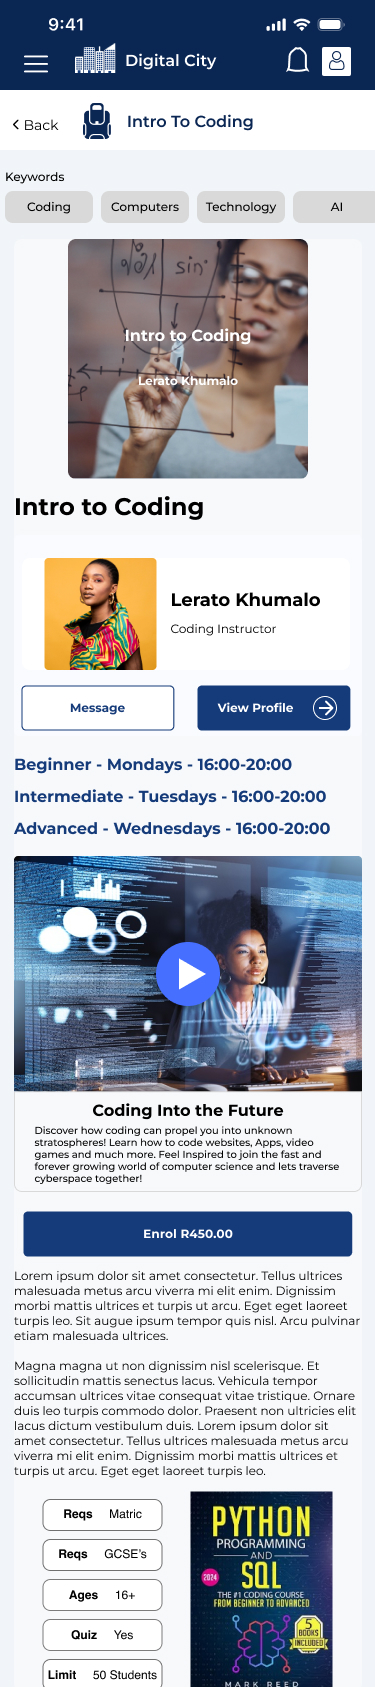
Once the user selects a course they are interested in they land on the course’s page that contains
- A link to the instructors profile and the ability to directly message the instructor to gain more information.
- The class sessions that take place each day and the times they take place.
- An Introductory video to watch so they can make their own decisions on whether the course is right for them.
- A button to enrol in the course.
- Class Descriptions and requirements including qualifications and any books they may need.
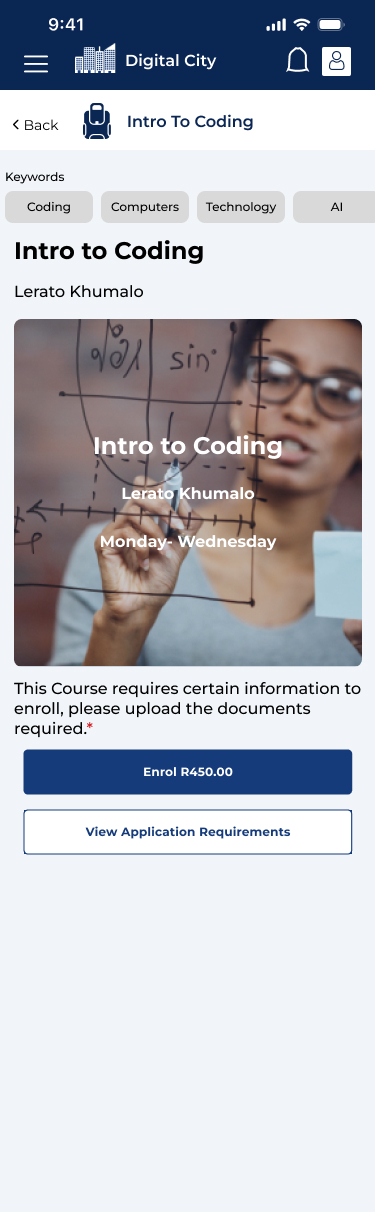
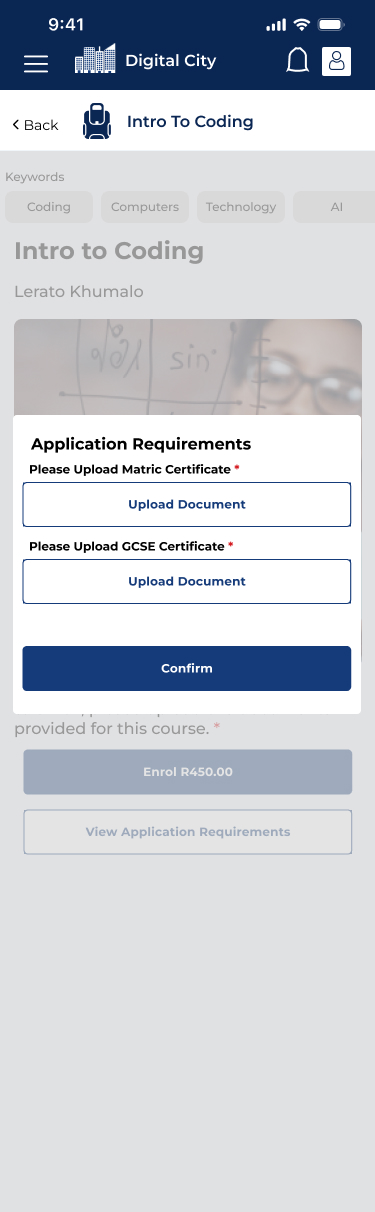
After the User has decided to take the course if there are certain qualifications they must upload documentation tapping the upload button. of it and this must be approved by the instructor. If there are assets such as a laptop or tablet they must sign a waiver and if the applicant is under 18 they must get parental consent to enroll.
How Students Navigate Courses
Once the user has successfully enrolled in a course their Dashboard will appear to reflect that.
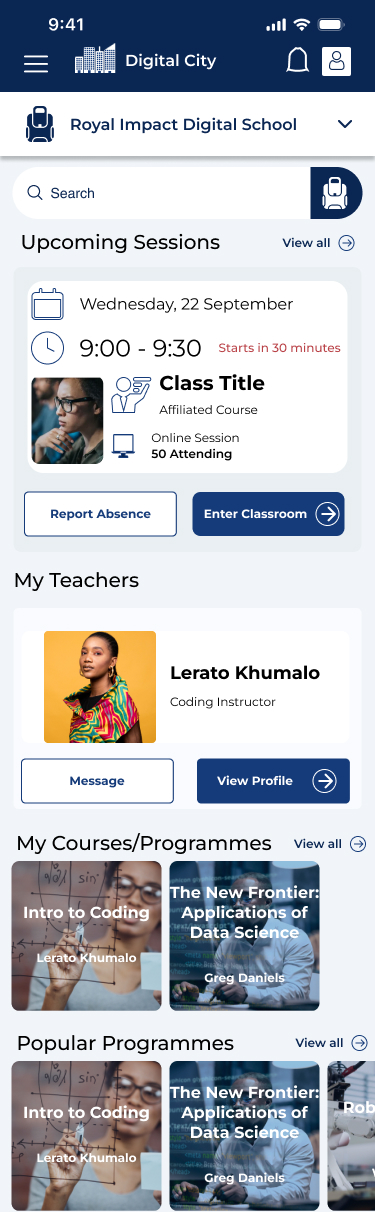
- Their upcoming class session is the first thing to appear on screen.
- This is followed by a link to the instructor so they can easily contact them with any pertinent questions.
- This is followed by the courses/programmes that they are currently taking so they can quickly navigate.
- Under all this is still the ability to see more courses or programmes they may be willing to enroll into.
Programme View

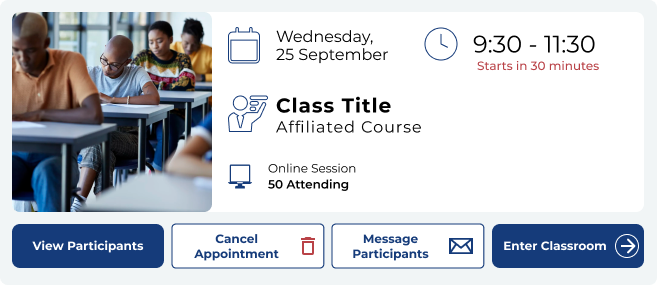
Once the student views their course by either tapping ‘Enter Classroom’ they get a full view of the course or programme and any modules attached to it. In this instance they have a class starting in 5 minutes and can join the meeting. The Iconography represents that this class will be online (laptop icon with 8/10 online next to it.

If the class session is in-person the icon is replaced with the two people shoulder to shoulder. Even if the class is in-person the student must ‘join meeting’ for attendance purposes.
The Student is also able to quickly view their progress through the ‘View my Progress’ button. They can watch videos and toggle between modules and classes involved with the course or programme. These class views are explained below.
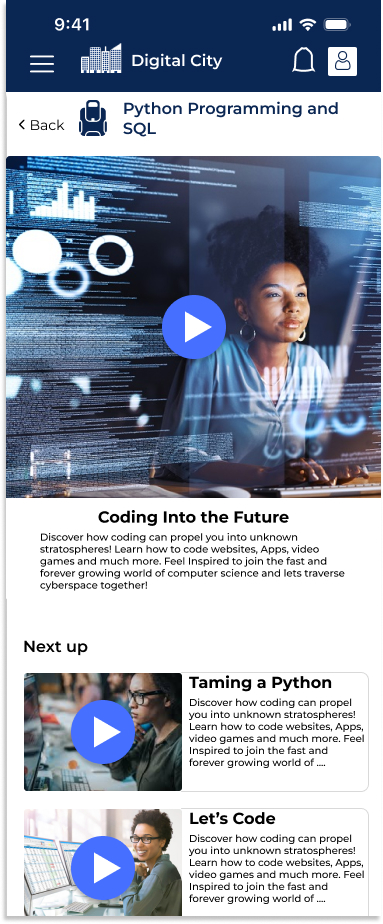
Course View

Very similar to the course/programme view:
- Easy to view progress in that Course.
- Ability to Direct message the instructor and go to their profiel to schedule meeting with them.
- Users can toggle through the classes aligned with the course.
- Each Class has a designated video, description and requirements.
- The next section is other media involved with the course that can be seen outside class sessions and often the instructor will post class sessions below too.
- Joining the meeting breaks out into a googlemeet.
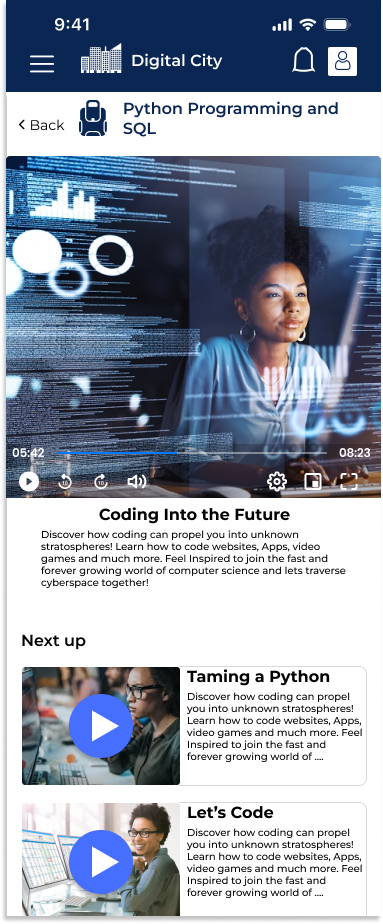
- Watching the videos enters a video area as shown below
Desktop view of class room
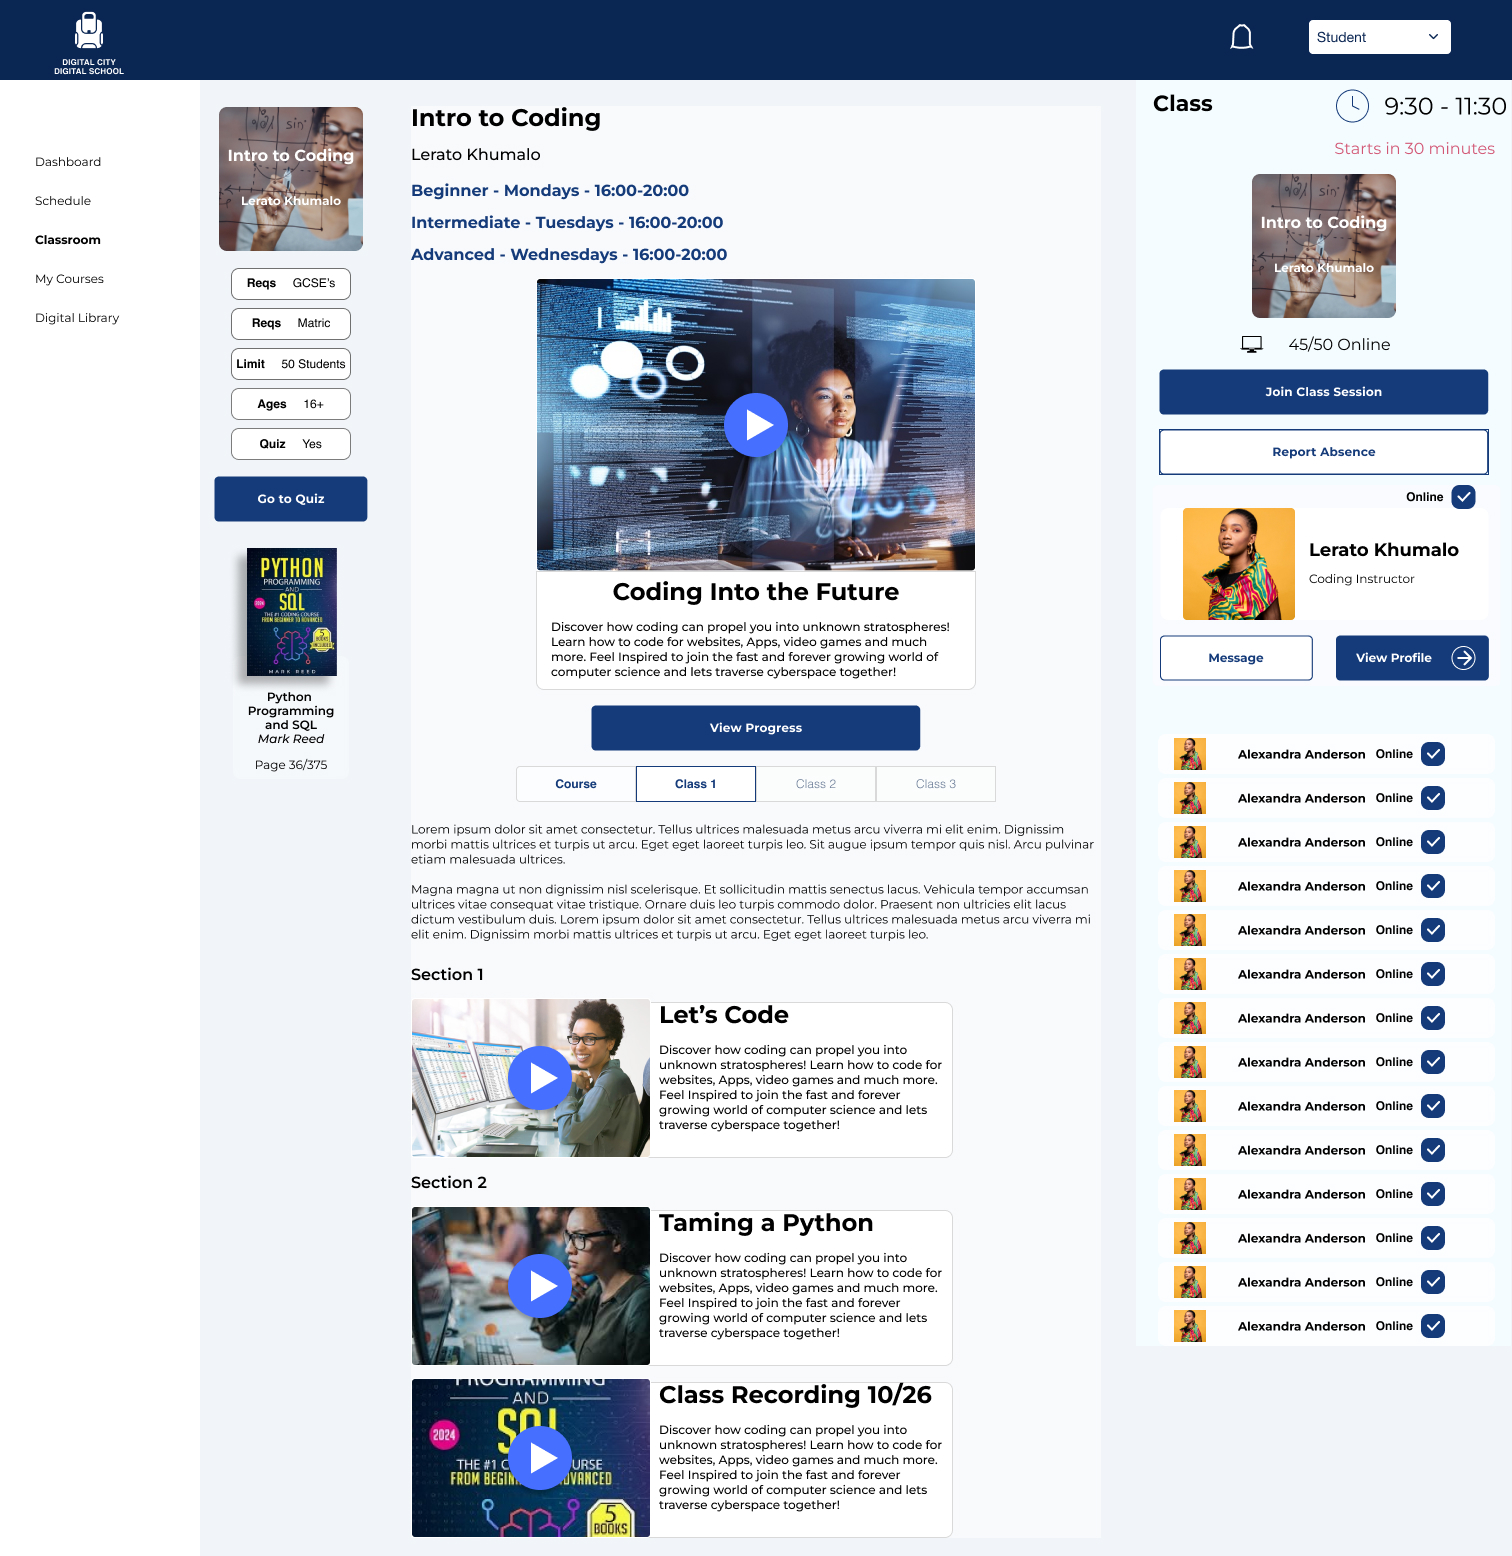
Similar to the instructors view but they lose the option to view students. They can go to the quiz using the left side navigation by the requirements and they can go directly to the required reading by clicking on the book leading them to the Digital Library. Main Video will keep you on the page in case there is something else to research, Section videos open a new tab.
Teacher Profile
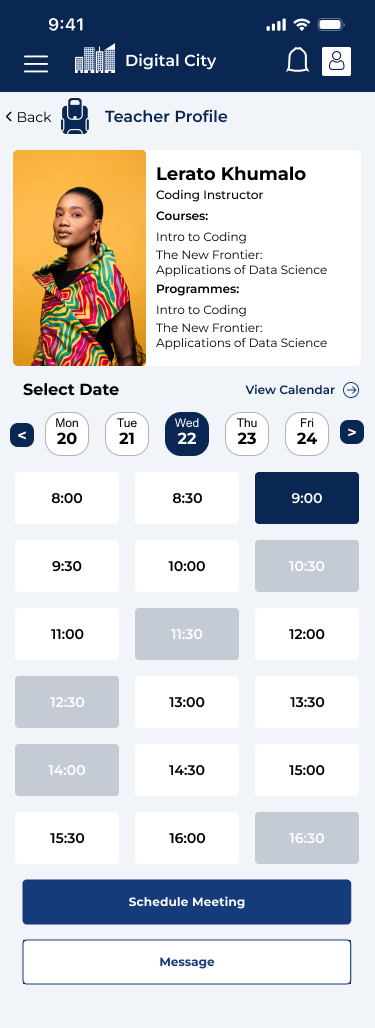
The teacher/instructor’s profile is really an avenue for students to schedule one on one meetings with them.
- List of teachers Courses/Programmes taught
- Easy side swipe daily calendar.
- Large buttons for open time slots.
- Primary button function to schedule a meeting.
- Ability for students to message the instructor about any questions.
Reporting absences
We’ve all been there when an emergency pops up and we are unable to make it to a commitment. So making it simple for students to report potential absences and reschedule appointments was a key part of the experience because life works in mysterious ways. Once the user selects ‘Report Absence’ they are led to this flow.
Class Absence

Meeting Absence
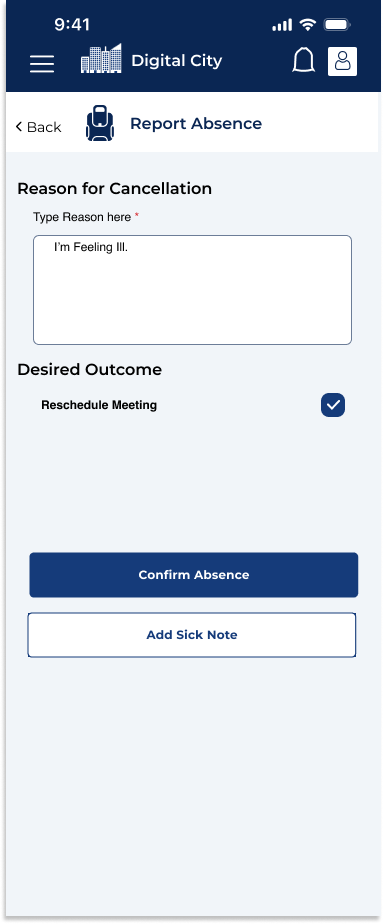
Add Sicknote
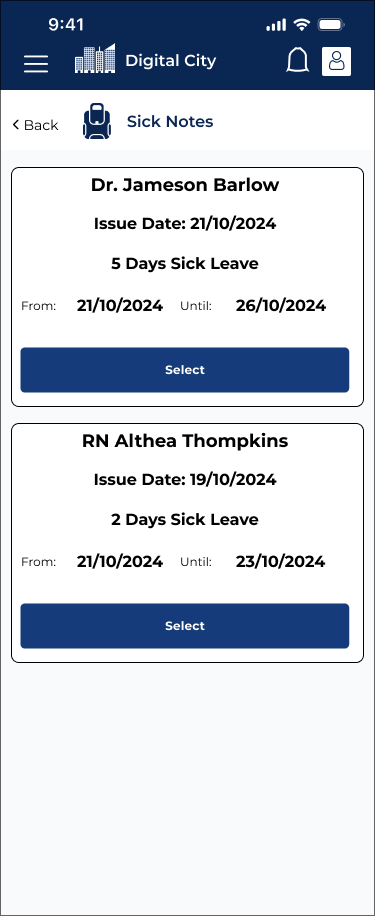
The student does not necessarily need a sick note but if they received one through an appointment or request through the Telemedicine Platform they can be used in the Digital School and automatically excuse the student.
Taking Quizzes and Viewing Progress
Students are able to take certain quizzes that the instructor creates on the platform. They can do this on mobile or on a desktop. All Quizzes are auto-graded except for short answer questions so the students are able to gauge how they may have performed on the quiz immediately after.


-Contains message that the quiz isn’t fully graded.
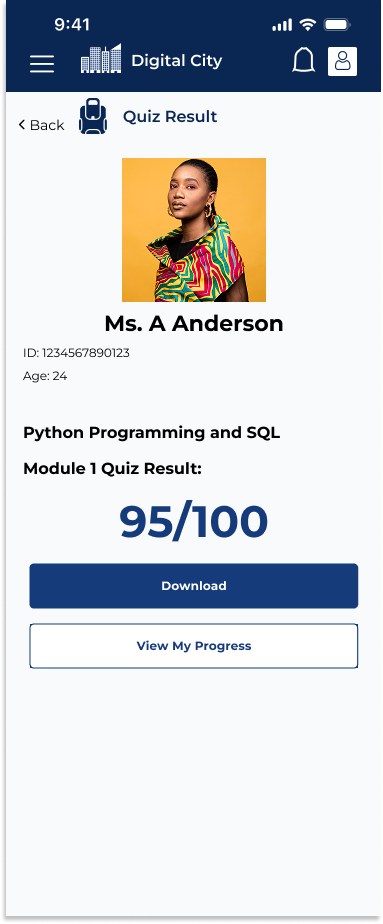
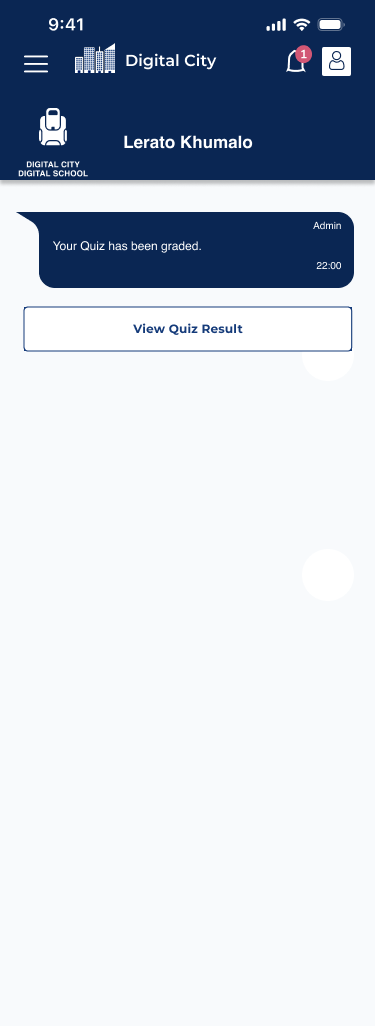
-Student Notified that quiz is graded.
Through the results the students can also view their progress through the course. Progress is measured through attendance and quiz scores.
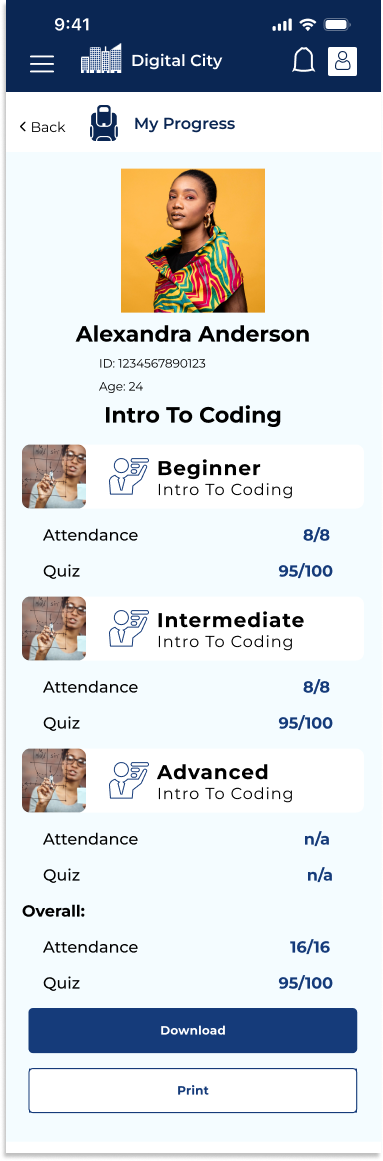
In this instance the student has completed two of the classes/modules with perfect attendance and strong quiz scores. They can print or download their progress. This is key for the students at the end of the course because it may be a prerequisite for a future course they may take.
Conclusions
Instructors
Since this is a multi-faceted platform the key goal was to make everything as simple and almost spoon-fed as possible. For instructors we wanted them to be able to create courses and programmes seamlessly since they were always going to be a slog with lots of information being entered onto the platform. Laying it out in steps that they control and separating Details and Description and class creation into different areas so theres no scroll fatigue in the form filling. We wanted a seamless transition so the data that was entered looks right on the actual course and classroom pages and is easier to digest. We also wanted them to be able to swiftly go through applications while being able to stay on the same screen so it is quicker. We also wanted to give them the ability to edit and add any media or quizzes after the class creation so they could do it in their own time and not have too much of a workload as sometimes it is better to return to something with fresh eyes and a fresh mind. The ability to add media through the classroom page also means they can upload their recorded class sessions for anyone who missed it due to an absence and allows students to look back at what was taught. It also gives them the freedom to post any other resources that may be helpful to students.
The key goal here was to allow the instructors to be as helpful as possible to help all their students achieve their goals.
Students
The key flow for students at first is to find a class that suits them and we gave them lots of avenues in which that was possible. The endgame is for them to enroll in a course or programme and once they have the platform caters to that with the courses or programmes they have enrolled in becoming the first point of contact when entering the platform. We wanted to make it so that it is just as easy on a mobile since some of the courses do not provide assets such as laptops that may be overly expensive if not provided. This allows students to work on the go especially since everyone lives busier lives.
Related Case Studies – Digital City
